Importing Data
CertHub provides comprehensive import capabilities that enable seamless data migration and content sharing between different instances or users. Whether you're importing schemas, knowledge units, or form and forms records, CertHub's import system ensures data integrity while making the process straightforward.
Supported Import Types
1. Knowledge Unit Schemas
Knowledge Unit Schemas form the foundation of your data structure in CertHub. You can import these schemas as JSON files, making it easy to share standardized data structures across your organization. To import a schema, navigate to the Knowledge Unit Schemas section and use the Import tab. The system accepts drag-and-drop files placement or manual files selection through the browser.
 To import a Knowledge Unit Schema, follow these steps:
- Navigate to the Schema Library section in the left sidebar of CertHub.
- Select the desired library where you want to import the schema (for example, "Requirements Engineering").
- Click the "Add New" button in the Knowledge Unit Schemas card.
- In the import tab:
- Click to select files or drag and drop your JSON file
- The system will validate that the file is in the correct JSON format
- You'll see a confirmation once the file is successfully uploaded
The system will validate the file format and structure before completing the import.
2. Knowledge Units
Knowledge Units contain the core information about the product and configurations that drive your knowledge base. These units can be imported as JSON files, allowing you to transfer complete knowledge structures between different CertHub instances. The import process preserves all configurations within the knowledge unit, ensuring that your data structure remains intact during transfer.
 To import a Knowledge Unit, follow these steps:
- Navigate to the Your Products section in the left sidebar of CertHub.
- Select the desired product where you want to import the units (for example, "Sterilisator 20A - MDR").
- Click the "Add New" button in the Knowledge Unit card.
- In the import tab:
- Click to select files or drag and drop your JSON file
- The system will validate that the file is in the correct JSON format
- You'll see a confirmation once the file is successfully uploaded
The system will validate the file format and structure before completing the import.
3. Knowledge Topic / List Records
Knowledge Topic records or Form List Recordsrepresent the most dynamic data in CertHub. The CertHub supports importing this data through CSV or XLSX files, providing flexibility for bulk data operations.
To import Knowledge Topic Records, follow these steps:
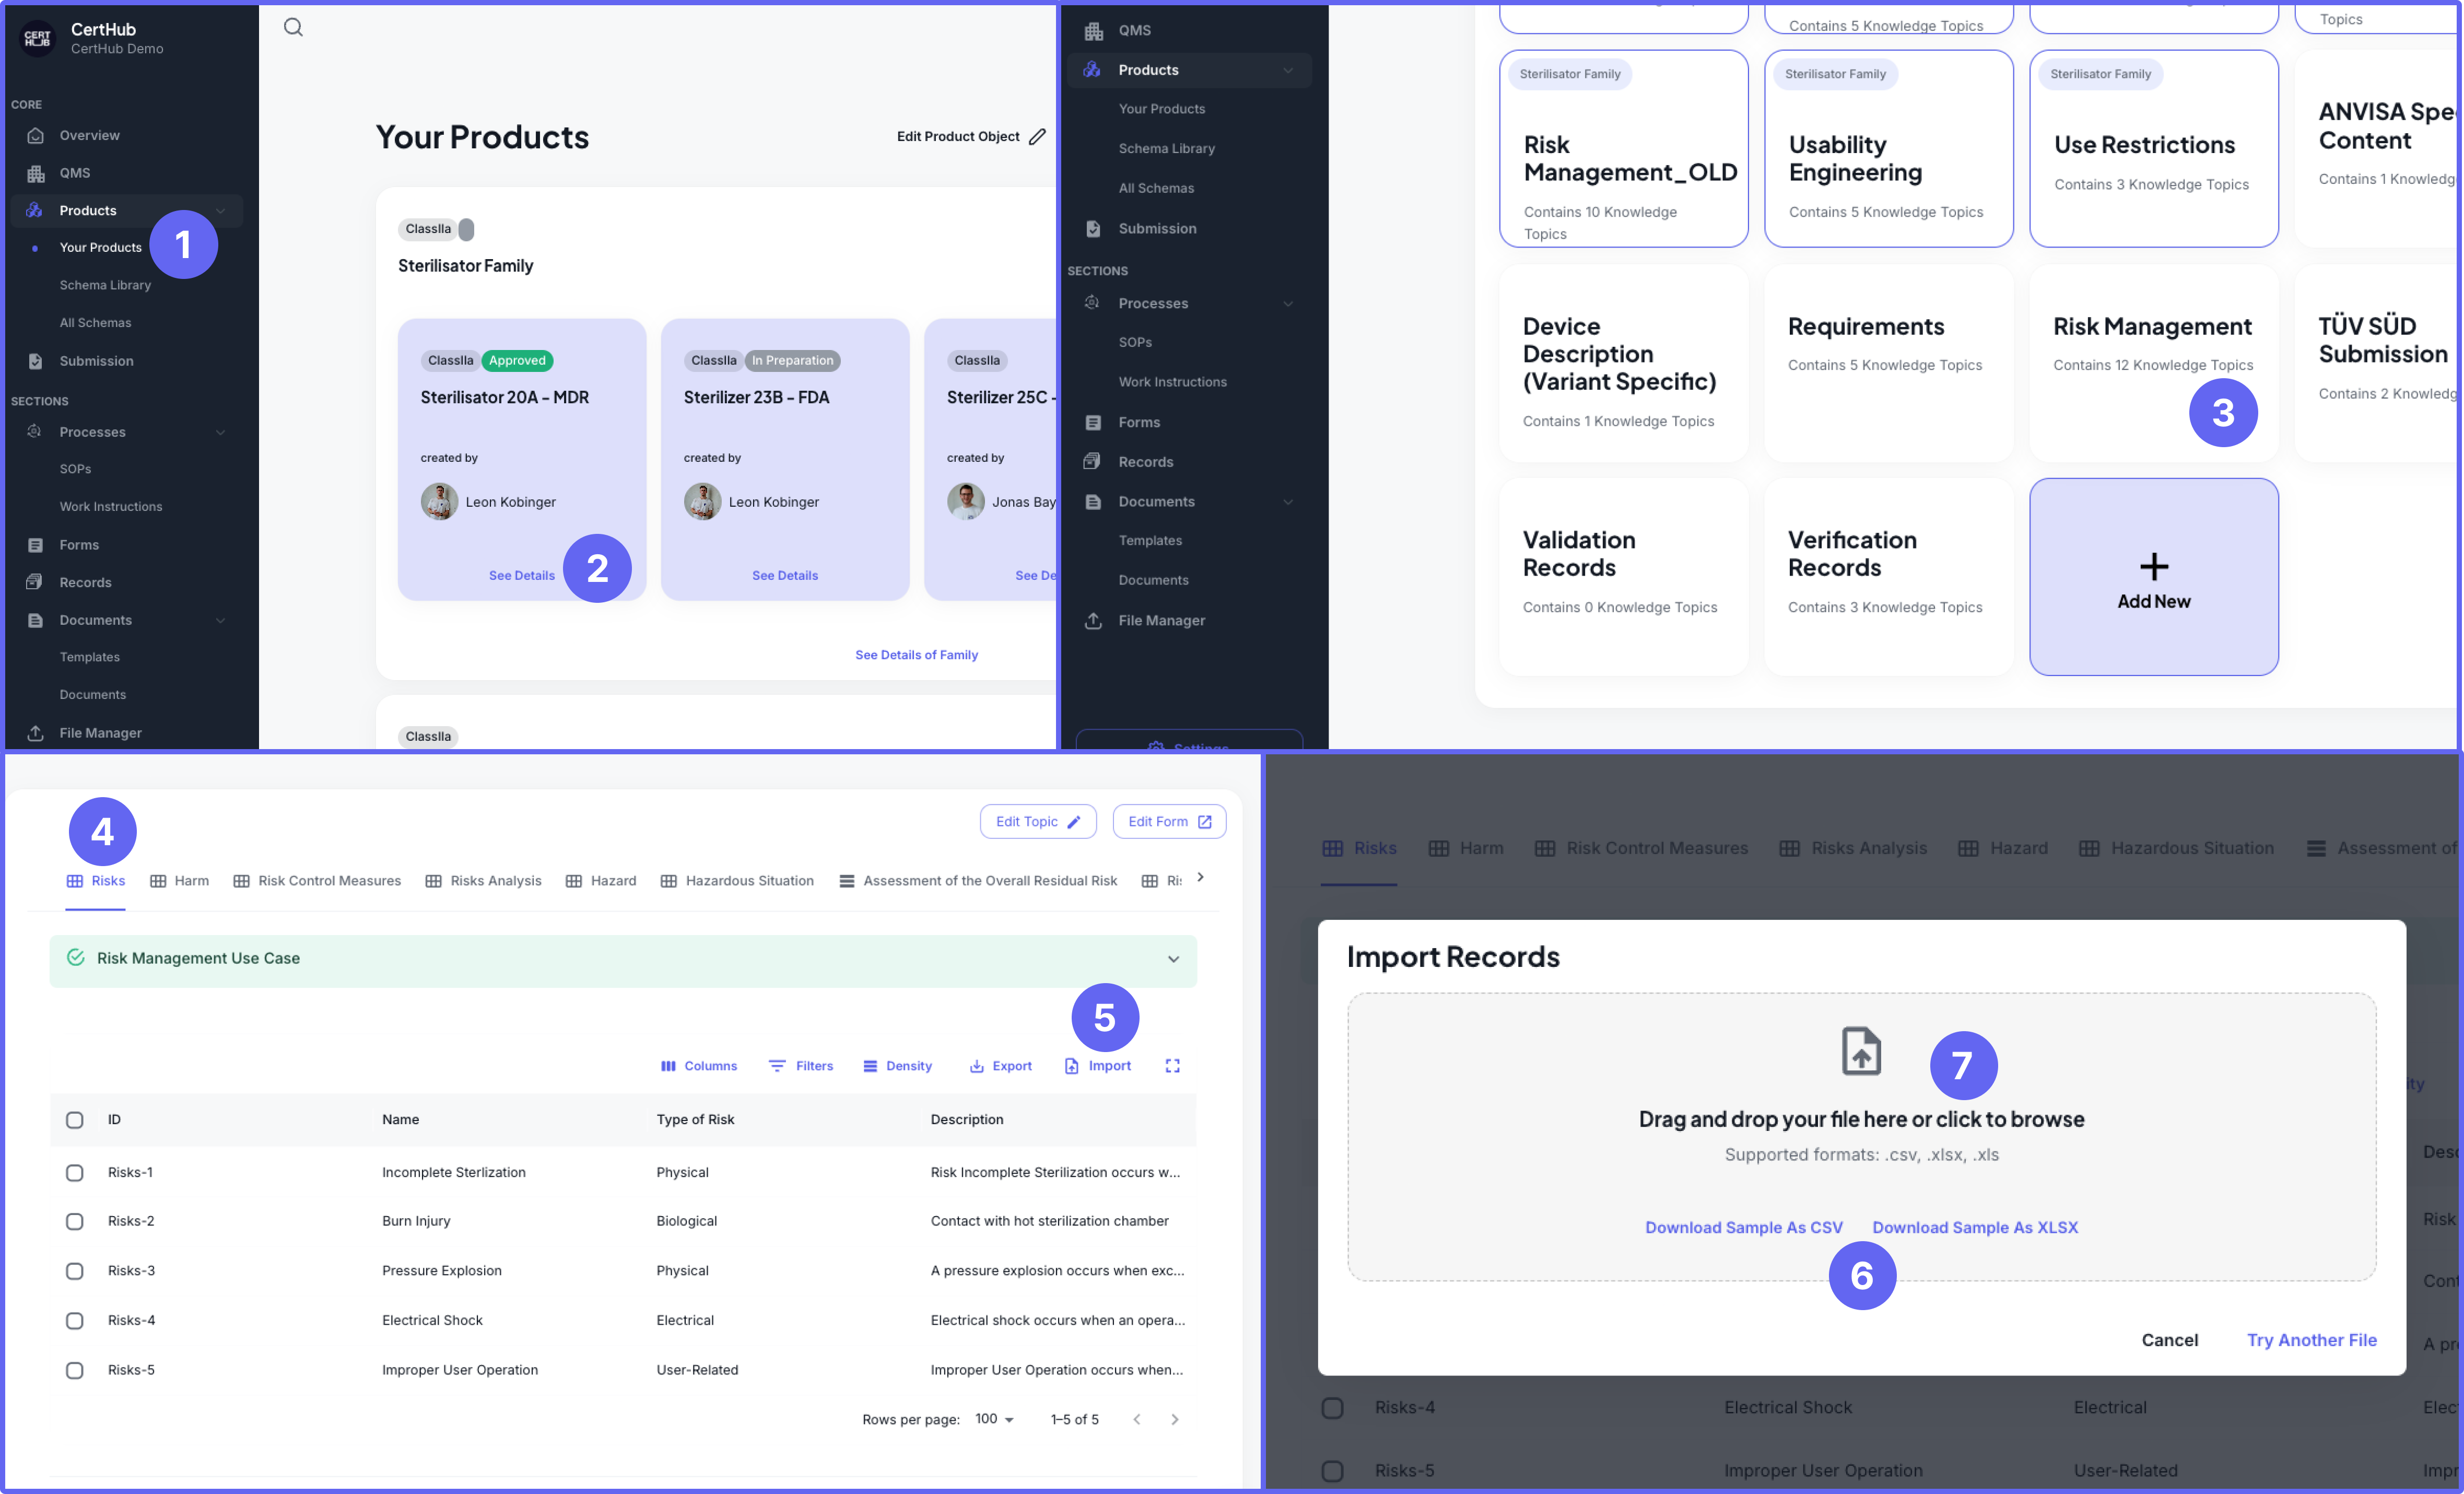
- Navigate to the Your Products section in the left sidebar of CertHub.
- Click on your product (for example, "Sterilisator 20A - MDR") to view its details.
- Select the Knowledge Unit where you want to import records (for example, "Risk Management").
- Select the Knowledge Topic where you want to import records (for example, "Risks").
- Click the "Import" button in the records view toolbar.
- In the Import Records dialog:
- Download a sample file by clicking either "Download Sample As CSV" or "Download Sample As XLSX"
- Fill in your data following the sample file structure
- Once your file is ready:
- Drag and drop your file into the designated area, or click to browse
- The CertHub supports .csv, .xlsx, and .xls formats
- You'll see a confirmation once the file is successfully validated and uploaded
You have to fill out the sample file from the import column and not the one from the export at this contains an auto generated id field.
4. Templates
Templates serve as the foundation for standardized content creation. When importing templates (in JSON format), CertHub preserves all formatting, placeholders, and dynamic content configurations. This allows organizations to maintain consistency across different instances while sharing best practices through template standardization.
To import Templates, follow these steps:
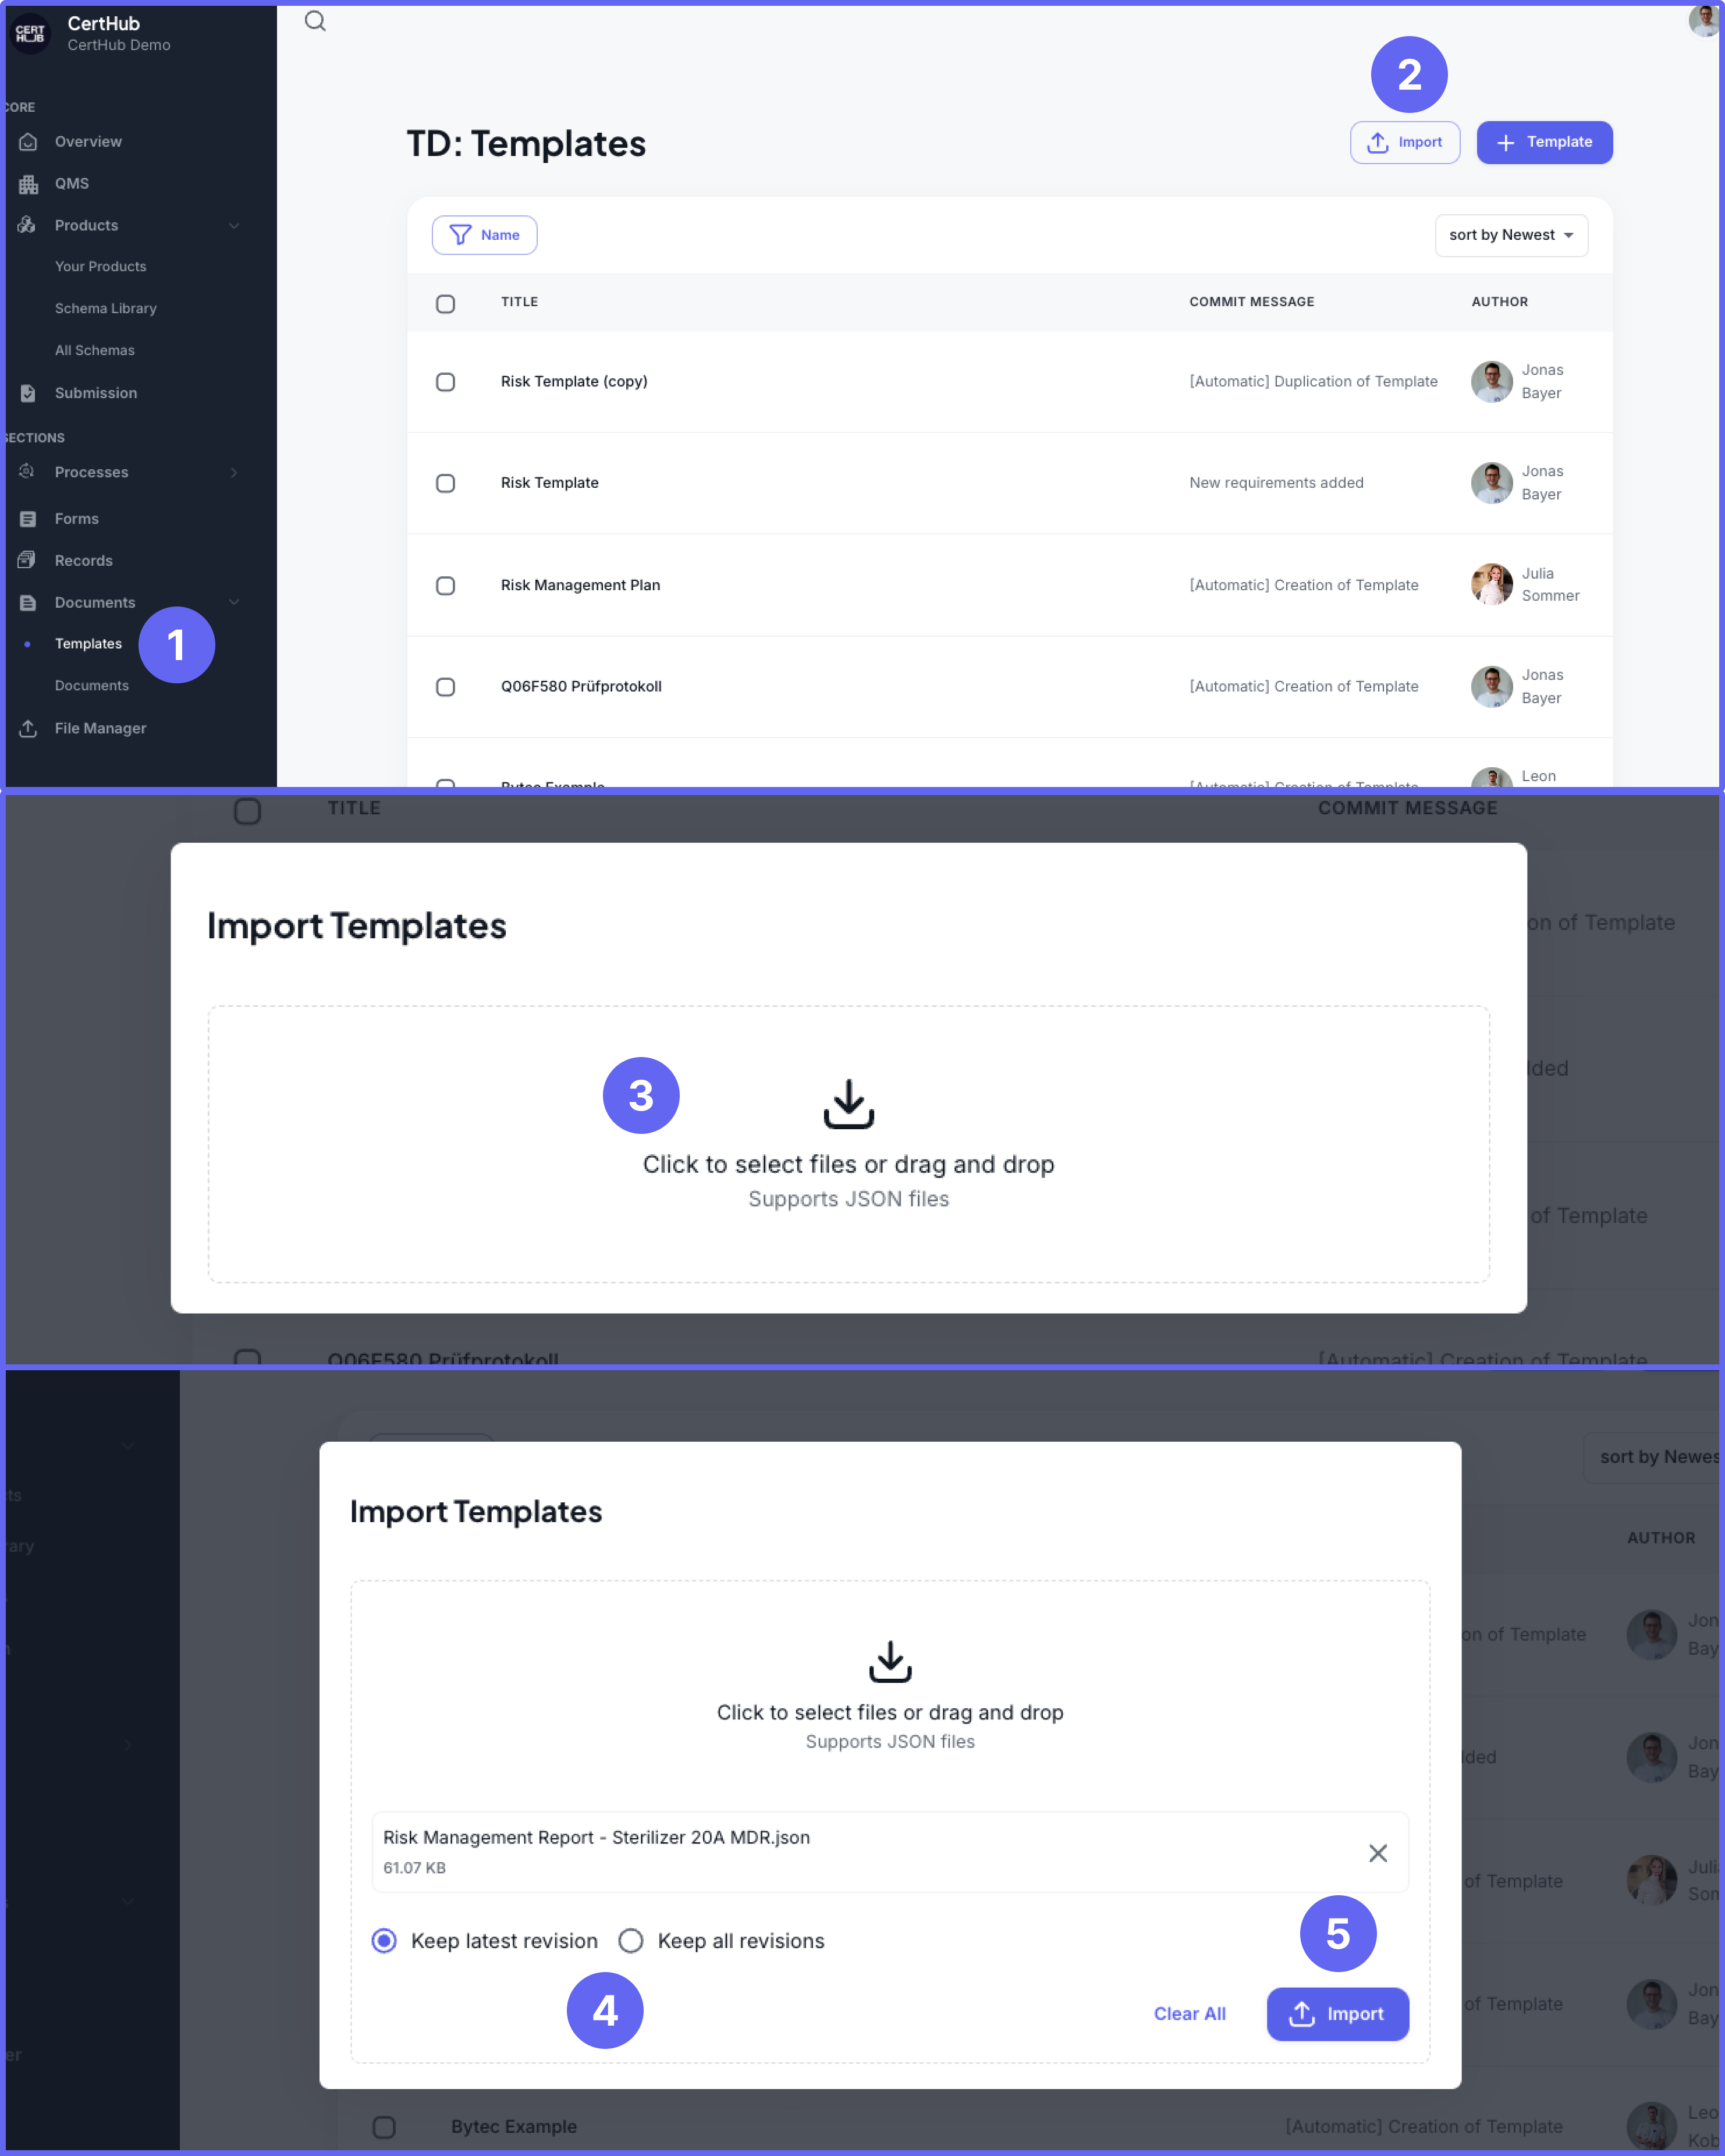
- Navigate to the Documents section in the left sidebar of CertHub and select "Templates".
- Click the "Import" button in the top-right corner of the screen.
- In the import dialog, click to select files or drag and drop your JSON file into the designated area (supports JSON files only).
- For imported templates, you can choose:
- Keep latest revision (default)
- Keep all revisions
- Click the "Import" button to complete the import process
The system will validate the template structure before completing the import to ensure all formatting and configurations are preserved.
5. Documents
Complete documents can be transferred between CertHub instances through JSON imports. These imports include not only the document content but also associated metadata, permissions, and relationships. This comprehensive approach ensures that documents retain their full context when moved between systems.
To import Documents, follow these steps:
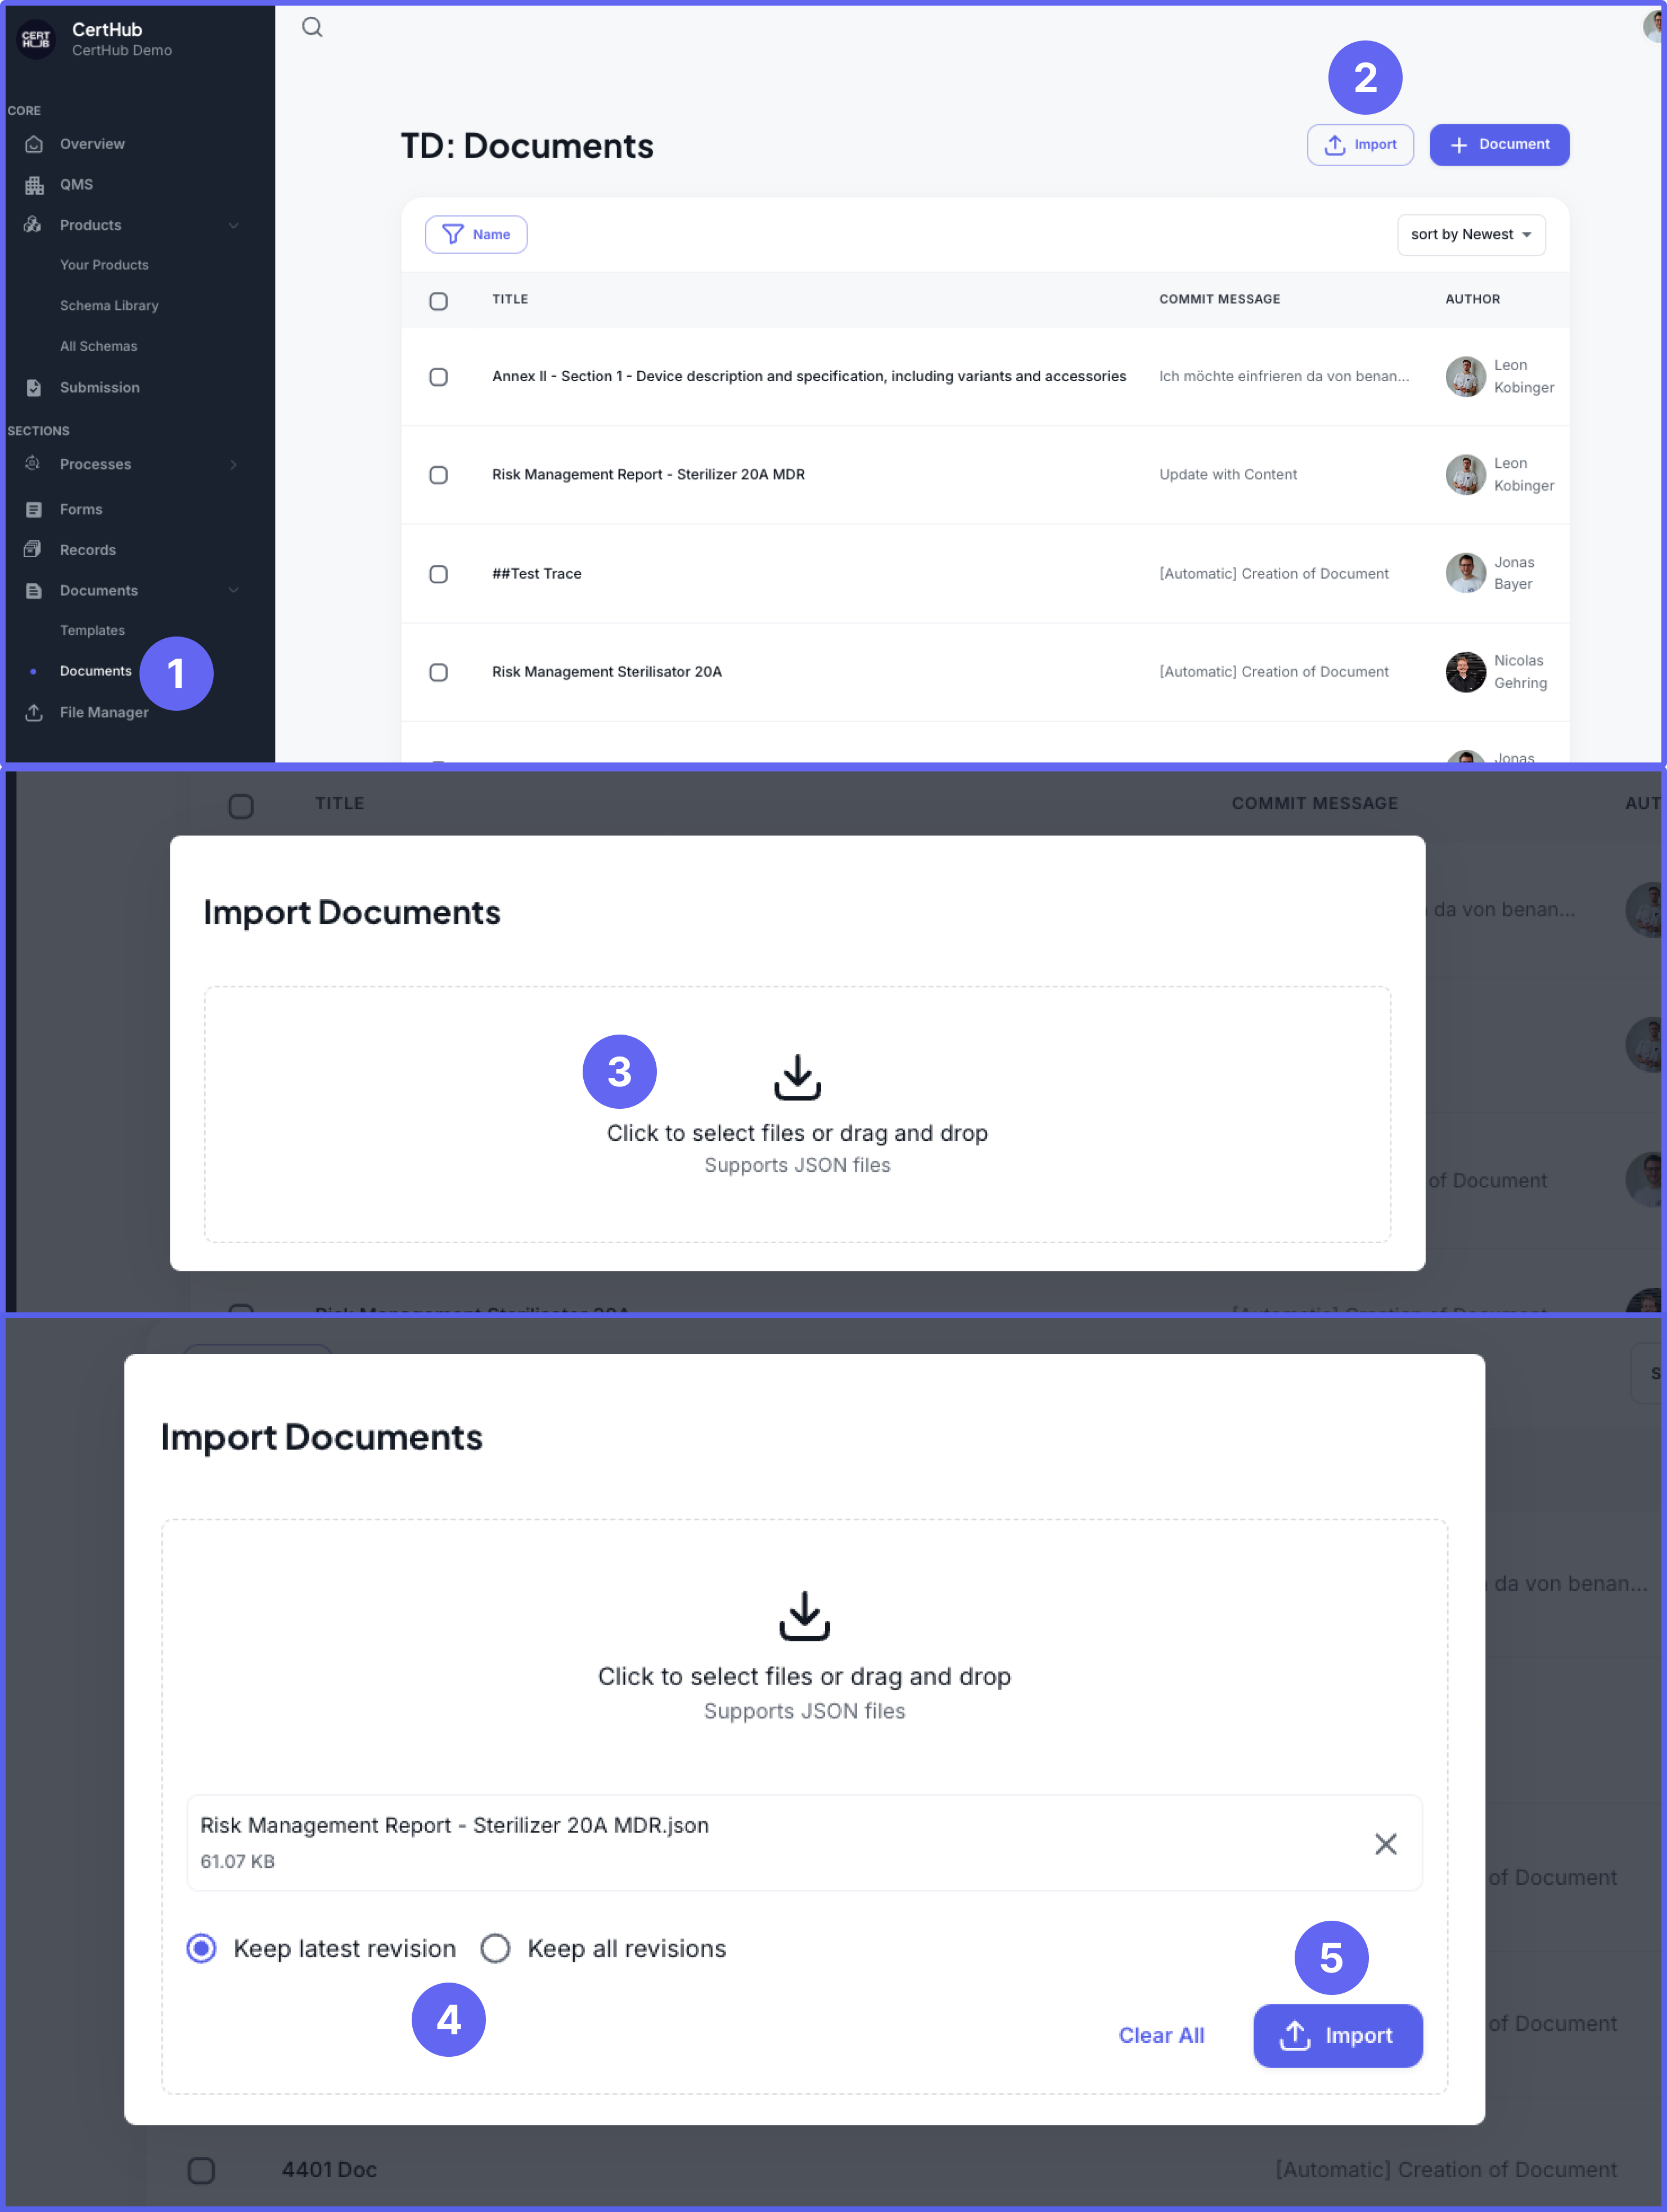
- Navigate to the Documents section in the left sidebar of CertHub and select "Documents".
- Click the "Import" button in the top-right corner of the screen.
- In the import dialog, click to select files or drag and drop your JSON file into the designated area (supports JSON files only).
- For imported documents, you can choose:
- Keep latest revision (default)
- Keep all revisions
- Click the "Import" button to complete the import process
6. Forms
Forms can be imported into the Forms Builder using .form files. These imports include complete form definitions, validation rules, and all configurations. For detailed information about importing forms, see the Forms Builder Import & Export documentation.
To import a Form:
- Open the Forms Builder
- Click the "Import" option from the Actions menu
- Select your
.formfile - The form will be recreated in the Forms Playground with all its configurations
7. Processes
Process definitions can be imported as .bpmn files, preserving all process flows, configurations, and linked items. For detailed information about importing processes, see the Process Editor Import & Export documentation.
To import a Process:
- Open the Process Editor
- Use the Import option from the Actions menu
- Select your
.bpmnfile - The process will be recreated with all its configurations
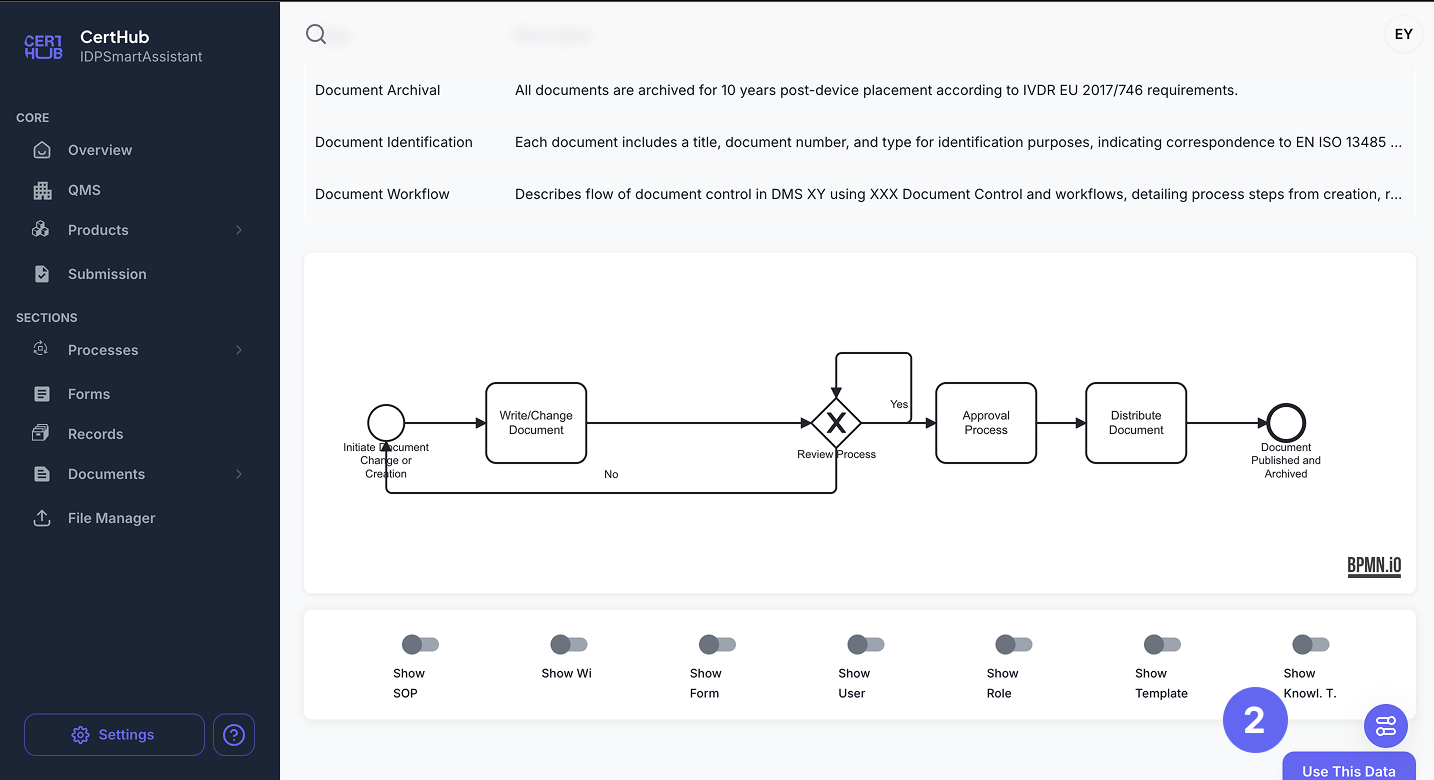
8. SOP Document Extraction Module
Automatically processes your SOP document to extract key data elements—including category, section, description, process steps, glossary entries, and background information—and organizes them into a structured format. In addition to extracting data, it creates a diagram that visually represents the process flow based on the extracted information.
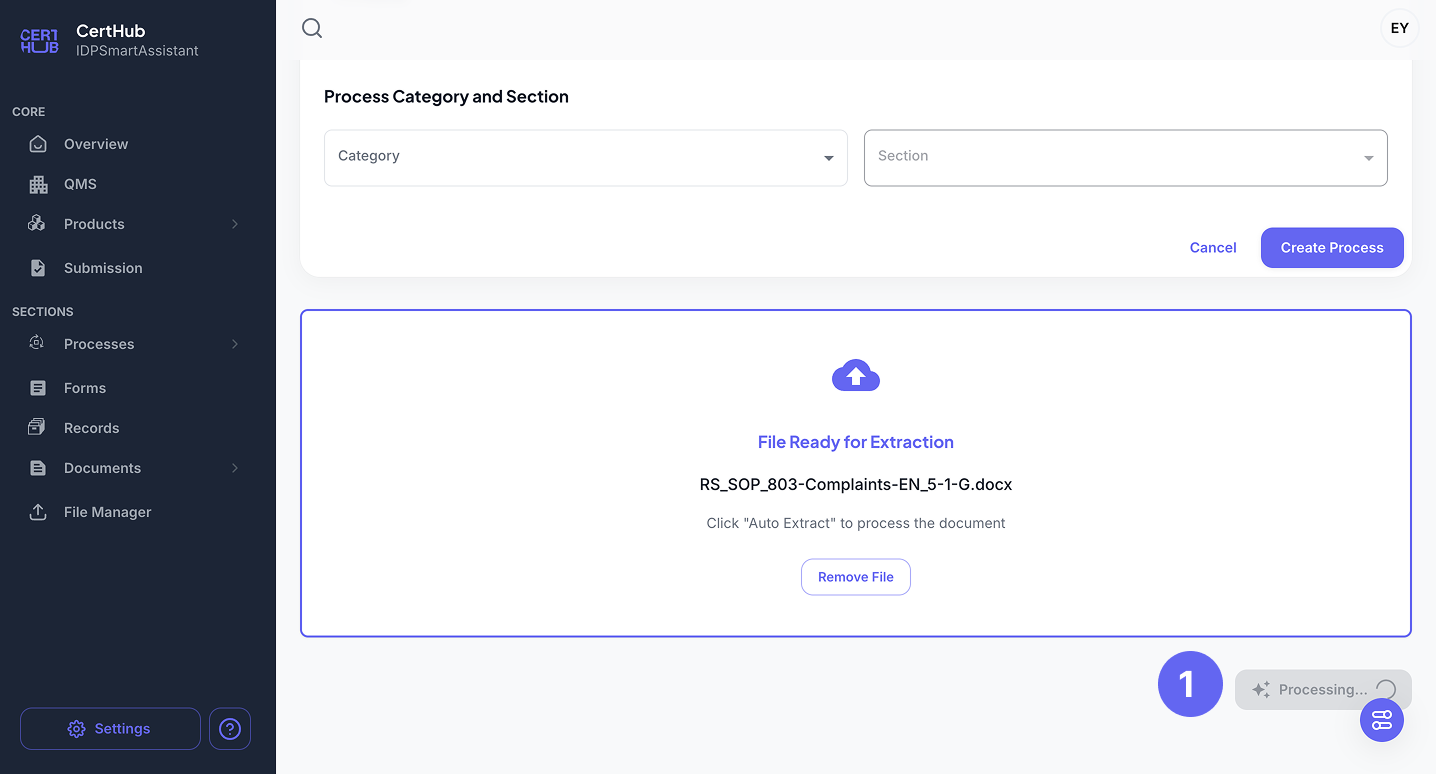
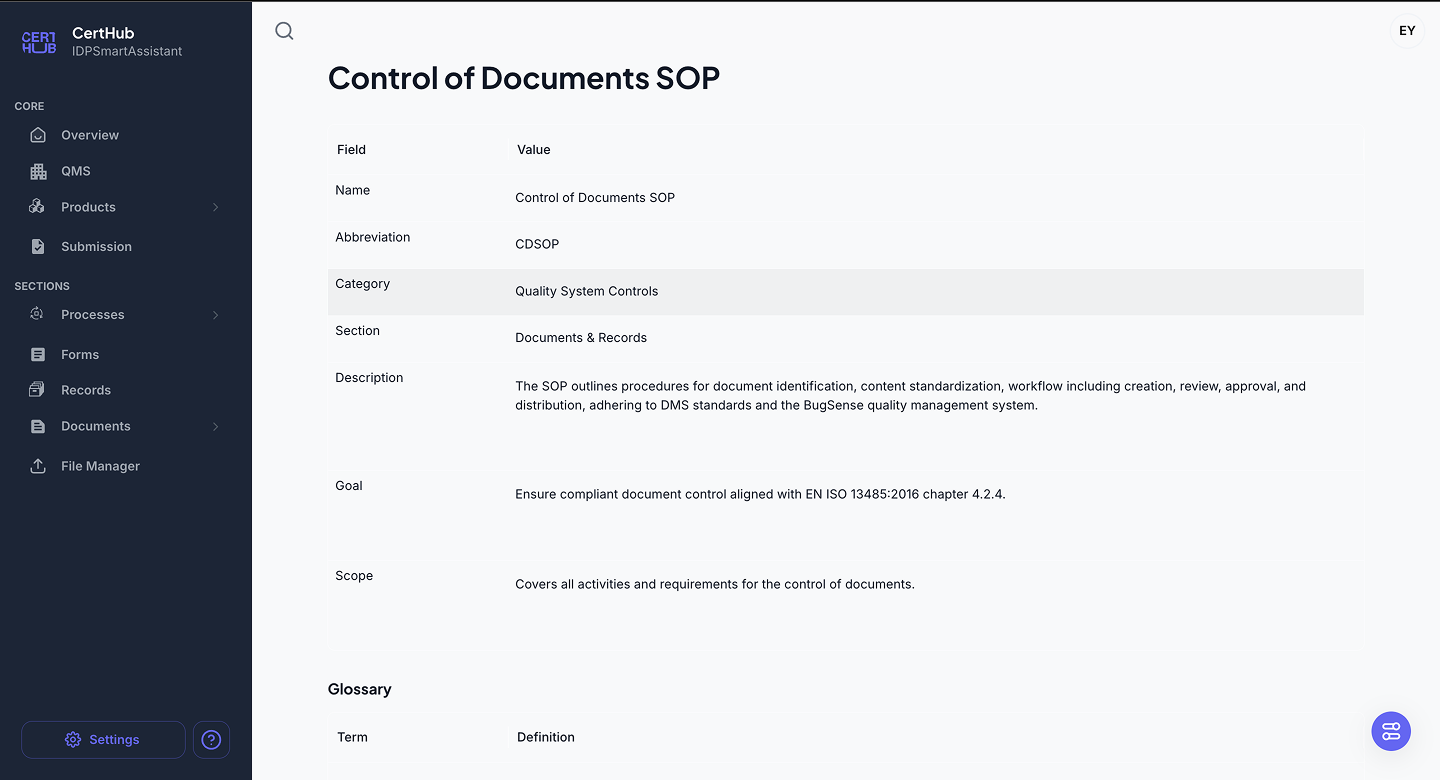
To extract data and generate a diagram:
- Open the Module: Navigate to the new SOP dashboard and access the SOP Document Extraction section in the below.
- Upload Your SOP Document: Drag and drop your file into the designated area, or click the "Choose File" button to select your document.
- Extract Data: Click the "Auto Extract from Document" button. The system will automatically extract the key elements and generate a corresponding process diagram.
- Review and Edit: Examine the extracted data and the generated diagram. Make any necessary adjustments before finalizing the creation of draft.
- Finilize: Click the "Use This Data" button to create your draft directly from your uploaded SOP file.
9. Word Documents
CertHub's Text Editor now supports direct import of Microsoft Word documents (.docx, .odt, .rtf, .md files) . The system intelligently extracts the layout, formatting, and content from your Word files and converts them to the CertHub Text Editor format.
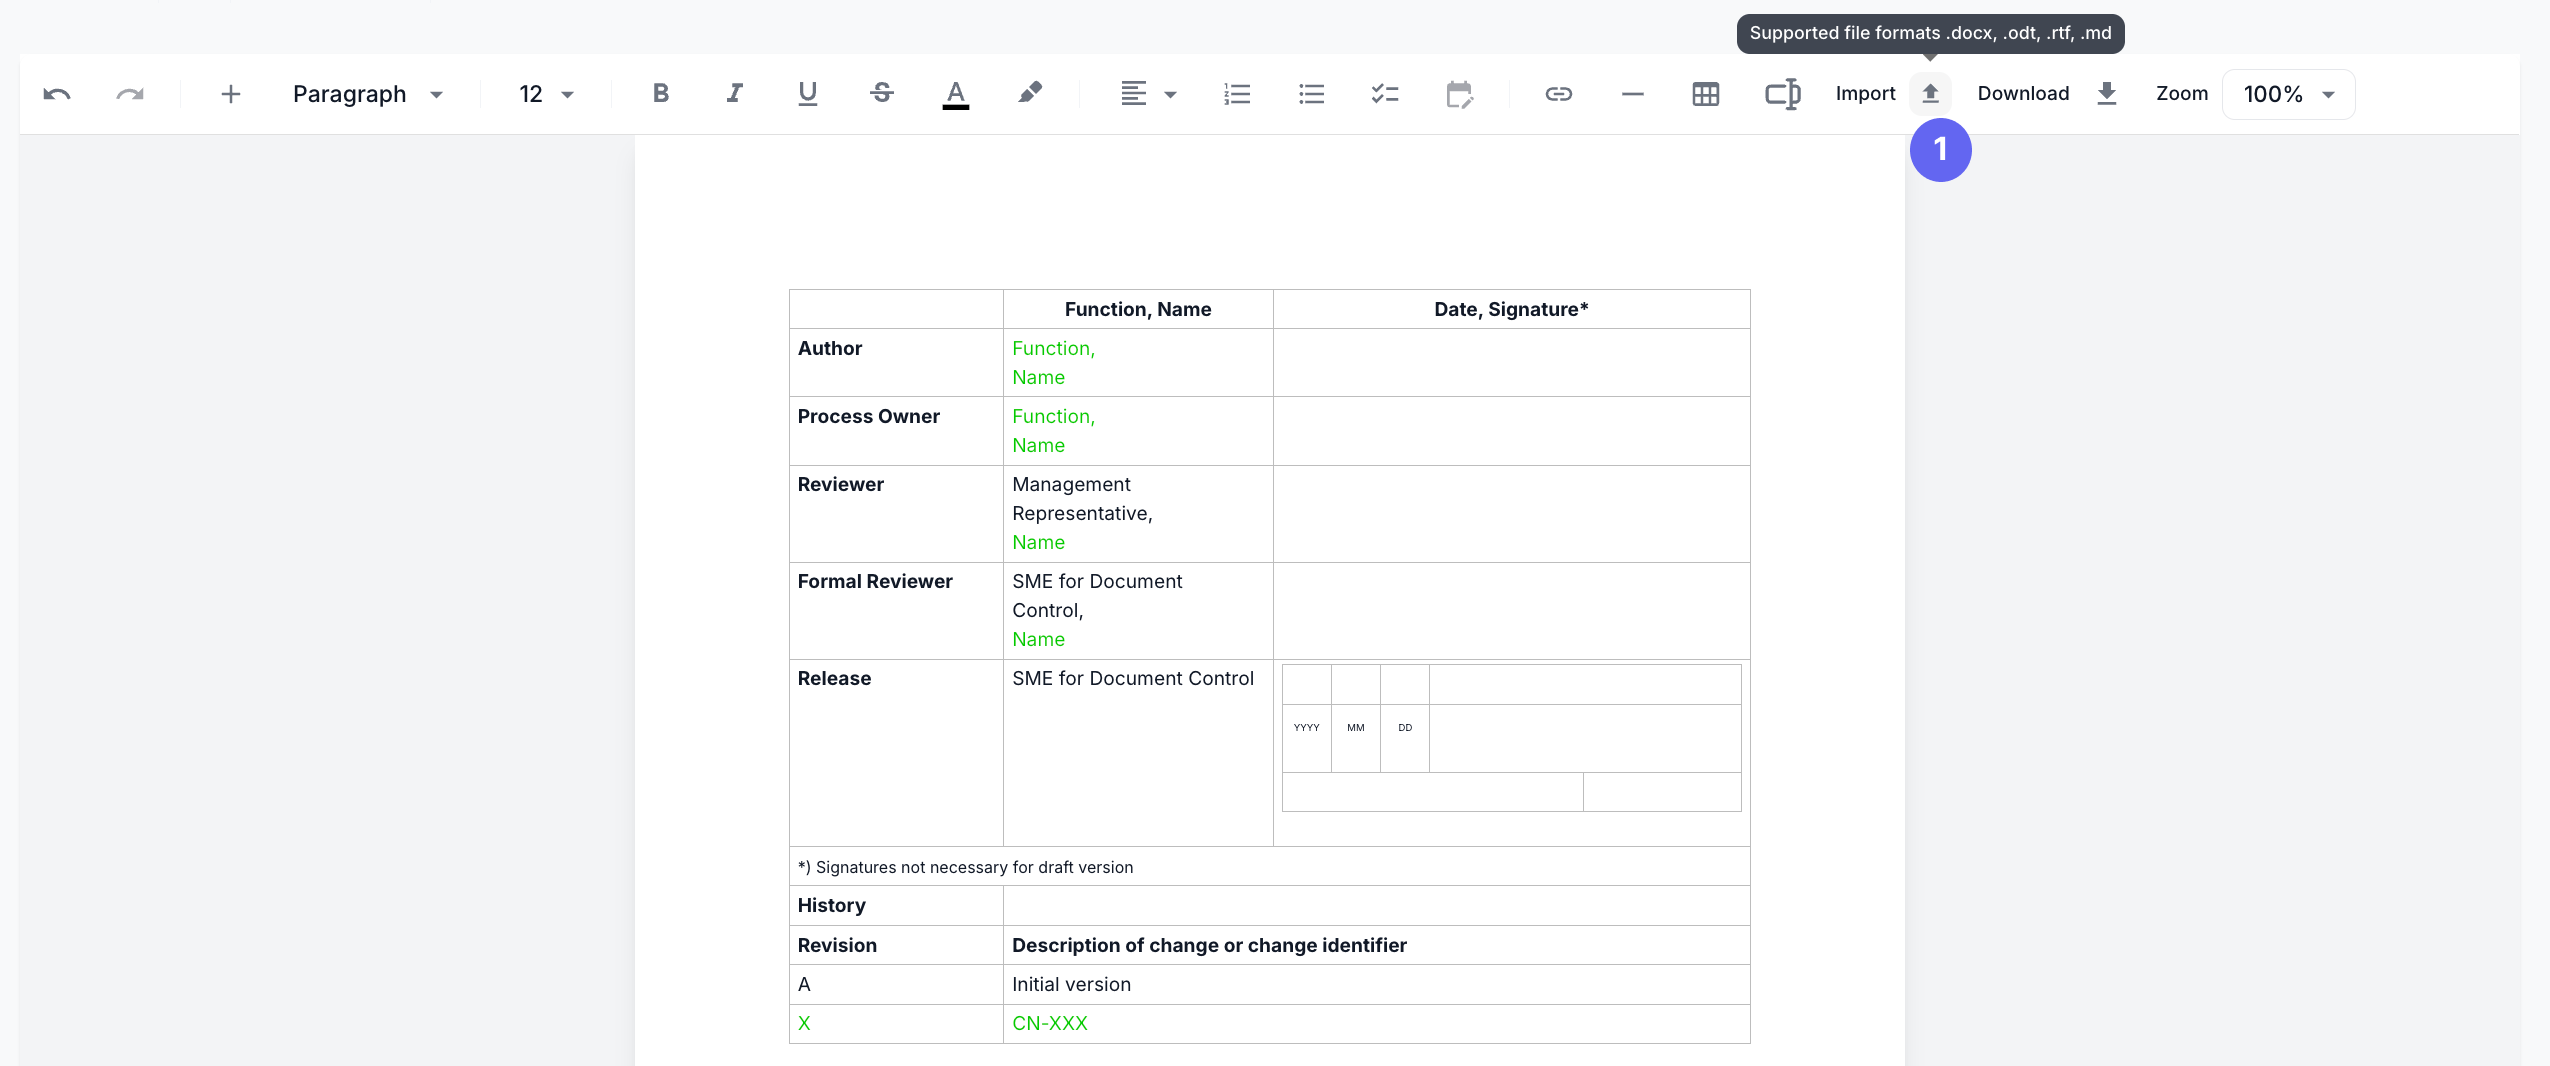
To import a Word document into the Text Editor:
- Open any document or template in the Text Editor
- Click the "Import" button in the toolbar
- Select your Word document (.docx, .odt, .rtf, .md file)
- The system will automatically extract and convert the content
- Review the imported content and make any necessary adjustments
The import feature preserves most formatting elements including headings, lists, tables, and basic text styling. Complex elements like macros, comments, or advanced formatting like complex nested tables may require manual adjustment after import.
For more details about using the Text Editor's import functionality, see the Text Editor documentation.